Wednesday, November 3, 2021

Connect to an On-Premise sftp server via Cloud Connector...!!!

 All you need to do now is to

  1. configure a new Cloud to On-Premise system mapping in your Cloud Connector and
  2. configure your sftp sender or receiver adapter accordingly

Let’s go step by step.

Configure a Cloud to On-Premise system mapping in the Cloud Connector

Logon to your Cloud Connector and add a Cloud to On-Premise system mapping. Maintain the parameter in the wizard as follows.

Set the Backend Type to ‘Non-SAP System’.

Select the ‘TCP’ Protocol. The configuration options for TCP are not as specific as for e.g. HTTP, i.e. the SAP Cloud Connector may not restrict potential misuse from your SAP Cloud Platform account. This is referred as security risk.

Maintain your On-Premise sftp server & port you want to connect to.

Define the virtual sftp server & port you want to expose to your SAP Cloud Platform Account (it will be re-used later in the sftp receiver adapter configuration).

Maintain an optional description, tick the ‘Check Internal Host’ checkbox (to have enable the ping test from SAP Cloud Connector to your On-Premise sftp server) and finish.

You may check and maintain your system mapping in the Cloud To On-Premise overview.

Logon to your Cloud Platform account and check the corresponding Cloud Connector status.

If all is fine you may consume your just established TCP connection in the sftp sender or receiver adapter.

Configure the sftp Sender or Receiver Adapter

Log on to the Cloud Integration WebUI and maintain the connection parameter in the sftp adapter properties as follows.

Maintain the virtual sftp server name & port for the proxy type ‘On-Premise’. Maintain the Location ID of the Cloud Connector, if configured in the Cloud Connector. Define the Authentication configuration as required by your On-Premise sftp server.

Done, save and deploy the integration flow. Start sending messages from SAP Cloud Integration via your own On-Premise sftp server or start polling files from your On-Premise sftp server.

Troubleshooting

If you run into errors executing your scenario you may find information for error analysis at the following places:

  • Integration Content Monitor in Cloud Integration
  • Message Processing Monitor in Cloud Integration
  • Cloud Connector Connectivity Test
  • SSH Connectivity Test
  • Log File in Cloud Connector

Let’s have a short look at the different tools.

Integration Content Monitor

After deploying the integration flow you should first check in the Integration Content monitor in SAP Cloud Integration if the integration flow is started successfully. As integration flows with sftp sender adapters start polling immediately after the integration flow is started, errors during the poll are shown here. No message processing log is created in this case.

In the Status Details area you may find the status and the details about the current poll status:

If there is an error when polling messages via the sftp sender adapter the error would be shown here for the respective integration flow. In the Polling Information the status of the consumption is shown as Failed.

the SOCKS proxy of the cloud connector. In this case you would have to check the monitor and the log files in the Cloud Connector for more details. Check that the request reaches your Cloud Connector instance at all, maybe the Location ID in Cloud Connector configuration does not fit to the Location ID used in sftp channel?

Message Processing Monitor

The second important monitor to be checked if your scenario does not work is the Message Processing monitor in the Cloud Integration Monitoring. If there is an error sending messages to a specific sftp receiver the error would be shown here.

In the below sample error, you see that the hostkey is rejected. This means that the public key of the sftp server is not maintained in the known hosts file for the configured virtual sftp host. Maybe the public key is maintained with the real sftp server address? If so, this entry needs to be changed in the known hosts file. Details about known hosts file maintenance you find in the blog How to setup secure connection to sftp server. Note that the public key cannot yet be downloaded via the Connectivity Test  when connecting to the sftp server via Clod Connector. The Connectivity Test will be updated soon to support this, the blog will then be updated.

SSH Connection Test

The Connectivity Test is available in Operations View in Web UI, in section Manage Security Material. Selecting the Connectivity Test tile from Overview Page opens the test tool offering tests for different protocols. To test the communication to the SFTP server, the SSH option is to be selected.

You can select the On-Premise Cloud Connector proxy and enter a Location ID also in the SSH test to test the connection to the SFTP server via the Cloud Connector:

The Cloud Connector Connectivity Test can be used to test if the Cloud Connector connected to the Cloud Integration tenant can be reached via the Cloud Integration’s runtime with the defined Location ID.

Like the SSH Connection Test, the Cloud Connector Test can be found in the Connectivity Tests tile in the Operations View in Web UI in section Manage Security Material. In the test tool select Cloud Connector. The only input field for the Cloud Connector test is the Location ID. Enter the Location ID you have configured in the Cloud Connector and also use in the adapter channel in the integration flow.

The test pings the Cloud Connector with this Location ID. If no Cloud Connector is connected with this Location ID the test fails:

If the Cloud Connector can be reached with the given Location ID the test executes successfully:

Cloud Connector Log

If you receive errors coming from the SOCKS proxy, you have to check the Cloud Connector log file for more information. Maybe the mapping for the used virtual host does not exist?

Tuesday, October 26, 2021

How to reset SAP* user in S/4 HANA or SAP on HANA...!!!


RESET SAP* user when SAP is running on HANA Database.


We are aware of the process to reset SAP* user in other SAP databases 
such as Oracle, MSSQL, Sybase etc.

This contains the  information to get the sap* user unlocked when 
your are running SAP on HANA database.

Step 1. Get the DB schema name. Login to SAP system and then 
Go to System -> Status


Pick up the schema user and schema name as shown above.

Here Schema name and user name  is SAPABAP1 


Step 2. Login to HANA studio with SAPABAP1 as a user name 

Right click on Database Connection and click on "Open SQL Console"


Step 3 : Execute Query in SQL console to display user first and then proceed with Update or Delete as needed.

a. Run select query to confirm whether you are on right path or not.

select * from USR02 where bname = 'SAP*' and mandt ='000'


b. Run Update query to Unlock the user by resetting the UFLAG

update USR02 set uflag=0 where mandt='000' and bname='SAP*'


This query will unlock the user SAP* user in client 000 , You can do the same for other client or user

c. Run delete query to delete the user SAP* from Client 000 (If you don't know the password)

delete from "SAPABAP1"."USR02" where bname = 'SAP*' and mandt ='000'

Step 4. (Optional) This is for the users who has opted for deletion

Set the value of parameter login/no_automatic_user_sapstar to 0 and restart the SAP instance.

You will be able to access SAP* through pass as a password.

Friday, October 15, 2021

How-to Review and Set SAP HANA Parameters - UPDATED Recommendations

 I have always found myself in below situations during my career as consultant for SAP HANA specifically in projects for implementation, migrations/upgrades, and even daily operation:

  1. SAP HANA Parameters setup during initial installation, following SAP best practice or recommended value(s).
  2. Review HANA Parameters of existing systems in case of HANA Support Pack Stacks or HANA Revision update.

It could be of company own systems, managing systems for customers, or from migration project taking over from other vendors.

Generate Recommendations

It is recommended to have the latest copy of SQL scripts from note 1969700. Run the “HANA_Configuration_Parameters_<version>.txt” in HANA Studio SQL Query Console, or SAP HANA Cockpit Database Explorer.

If the system you are checking is a SAP HANA multitenant database containers (MDC), this can run in both System DB and Tenant DB for the specific recommendations.

Example on the result from the query below, exported into spreadsheet.

HANA_Configuration_Parameters-Results

HANA_Configuration_Parameters-Results


Analyze the Recommendations

It is always important to review the recommendations gathered from the checks.

Using back the earlier example from the result runs in System DB. Some details on how to read the columns returned from result of query check. I have put in screens from HANA cockpit Database Configurations tile, and HANA Studio Configuration tab for the familiarity to those who uses them.

FILE_NAME – The INI file where these parameters are configured.

SECTION – Section under the INI files.

PARAMETER_NAME – The parameters checked

CONFIGURED_VALUE – Current value set in the system)

RECOMMENDED_VALUE – Recommendations based on the query check, against note 2600030.

SAP_NOTE – The SAP note where more detailed information regarding the parameters, the recommended settings etc.

CONFIG_LAYER – Layers where parameter is set, such as DEFULT, SYSTEM, DATABASE, HOST

HANA_Configuration_Parameters%20Results

HANA_Configuration_Parameters Results

HANA%20Cockpit%20Reference

HANA Cockpit Database Configuration

HANA%20Studio%20Configuration

HANA Studio Configuration


In this example let’s look at below 2 parameters recommendations.

  • Parameter max_table_count_in_statement default at 4095 during installation, which preventing some of the HANA SQL script run ended with error due to -> 463: number of tables exceeds its maximum: 4095; or 463: number of tables exceeds its maximum: table count in statement exceeds its maximum:4095.
  • Parameter num_cores for preprocessor job queue which only available in HANA System DB services. In the RECOMMENDED_VALUE column “10 to 48 [10]” suggesting a value ranges between 10 to 48; and suggested to start with 10 as initial.


Another example for the similar query run on tenant Database, below recommendations are suggested in accordance with workload management, better monitoring, and control on the HANA resources for finer level of granularity etc.

  • Enabling resource tracking for memory and expensive statement monitoring using views M_SQL_PLAN_CACHE or M_EXPENSIVE_STATEMENTS.
  • Setting statement memory limit to prevent single statement over using available memory, due to possibilities like poor SQL query handling or memory leak.
  • Enabling monitoring of thread activities through view M_SERVICE_THREAD_SAMPLES.
  • Parameters for Garbage Collection Optimization on specific HANA revisions, such as garbage_collect_interval_s.


Another situation the query check and results would be helpful. If there is/are parameter(s) currently set in the system and might need to be revised. This could be case of post HANA upgrade i.e., from HANA 1.0 to HANA 2.0, or SP3 to SP4/SP5, or even minor revision update.

One example such as below parameter check_cancel_at_allocation which is a workaround set in earlier HANA revision and is fixed on higher revision, as mentioned in note 2092196.

  • Revisions <= 048.06 (SPS04)
  • Revisions <= 050.00 (SPS05)

These types of parameters should be review and unset them as a housekeeping measure after HANA updates.


Implement Recommendations / Fallback

After completed the analysis and concluded on the required parameters.

The SQL query for setting the parameters is also provided in the result column IMPLEMENTATION_COMMAND. This helps to set parameters at once or set for similar system using same commands.

The other column UNDO_COMMAND from the result provided the query to unset/reset the parameters, in the event of fallback.


Below are the SQL to be executed for setting parameters based on recommendations:

At System DB SQL commands.

ALTER SYSTEM ALTER CONFIGURATION (‘nameserver.ini’, ‘SYSTEM’) SET (‘sql’, ‘max_table_count_in_statement’) = ‘0’ WITH RECONFIGURE;

ALTER SYSTEM ALTER CONFIGURATION (‘preprocessor.ini’, ‘SYSTEM’) SET (‘jobqueue’, ‘num_cores’) = ’10’ WITH RECONFIGURE;

At Tenant DB SQL commands.

ALTER SYSTEM ALTER CONFIGURATION (‘global.ini’, ‘SYSTEM’) SET (‘persistence’, ‘max_gc_parallelity’) = ’48’ WITH RECONFIGURE;

ALTER SYSTEM ALTER CONFIGURATION (‘global.ini’, ‘SYSTEM’) SET (‘resource_tracking’, ‘enable_tracking’) = ‘on’ WITH RECONFIGURE;

ALTER SYSTEM ALTER CONFIGURATION (‘global.ini’, ‘SYSTEM’) SET (‘resource_tracking’, ‘memory_tracking’) = ‘on’ WITH RECONFIGURE;

ALTER SYSTEM ALTER CONFIGURATION (‘global.ini’, ‘SYSTEM’) SET (‘resource_tracking’, ‘service_thread_sampling_monitor_enabled’) = ‘true’ WITH RECONFIGURE;

ALTER SYSTEM ALTER CONFIGURATION (‘indexserver.ini’, ‘SYSTEM’) SET (‘joins’, ‘single_thread_execution_for_partitioned_tables’) = ‘false’ WITH RECONFIGURE;

ALTER SYSTEM ALTER CONFIGURATION (‘indexserver.ini’, ‘SYSTEM’) SET (‘lobhandling’, ‘garbage_collect_interval_s’) = ‘43200’ WITH RECONFIGURE;

ALTER SYSTEM ALTER CONFIGURATION (‘indexserver.ini’, ‘SYSTEM’) SET (‘memorymanager’, ‘huge_alignment_cache_target’) = ‘10240’ WITH RECONFIGURE;

ALTER SYSTEM ALTER CONFIGURATION (‘indexserver.ini’, ‘SYSTEM’) SET (‘memorymanager’, ‘huge_alignment_gc’) = ‘false’ WITH RECONFIGURE;

ALTER SYSTEM ALTER CONFIGURATION (‘indexserver.ini’, ‘SYSTEM’) SET (‘transaction’, ‘aggressive_gc_interval’) = ‘300’ WITH RECONFIGURE;


Thursday, September 23, 2021

SAP system is not responding - Log Volume is full & HANA DB.

 Log Volume is full & HANA DB, SAP system is not responding the follow the below steps to resolve the issue.


If we manually remove some file from the directory, data loss will happen & Hana system won't cam up after that. Recovery is the only option if we remove the file manually.

Issue - /hana/log - 100%

Solution -

Ø  Stop HANA DB
       HDB Stop 

Ø  Go to /hana/log/SID/mnt0001
      default location - /usr/sap/SID/global/hdb/log/mnt0001

 Ã˜  Move one volume temporarily that having more than 2 GB to another location  where  enough space is available.
  
   To start Hana DB at least 2 GB space is required, 
   Check the folder size using - du -ksh *

 Ã˜  Move a volume which consumes 2 GB of space 
       eg - hdb0002

      mv hdb0002 /usr/sap/SID/global/hdb/data
      or
      mv hdb0002 /hana/backup/SID (if you are using separate volume for log)

 Ã˜ Create symbolic link to the new folder in the old location

    In -s hdb0002 /usr/sap/SID/global/hdb/data/hdb0002      /usr/sap/SID/global/hdb/log/mnt0001 /hdb0002 

 Ã˜  Start the HANA Database
        HDB start

 Ã˜   Wait until log backup are performed 

 Ã˜   Use the following SQL command to clean up the log volume 

    ALTER SYSTEM RECLAIM LOG;

 Ã˜   Stop the HANA database & Remove the symbolic link

    rm -f /usr/sap/SID/global/hdb/log/mnt0001 /hdb0002 

 Ã˜   Move  the log volume back to the original location

    mv hdb0002 /usr/sap/SID/global/hdb/log/mnt0001 

 Ã˜   Start the HANA Database again

    Now the Volume size will be fine.

Reference - SAP note 1679938

Renewing SAPRouter Certificate...

 Check the saprouter validity date using the below command,


./sapgenpse get_my_name -n validity

If it expired follow the below steps to renew the saprouter certificate,

1. Take a backup & delete the following files from saprouter folder

    certreq
    cread_v2
    local.pse
    srcert

2. Create a file with name certreq

     Run the below command to generate new certificate request,

./sapgenpse get_pse -v -r certreq -p local.pse “<Distinguished Name>”

3. Go to the SAP Service marketplace & go to Router option using below link,

https://support.sap.com/en/tools/connectivity-tools/saprouter.html

Click on "Apply for a SAProuter certificate"

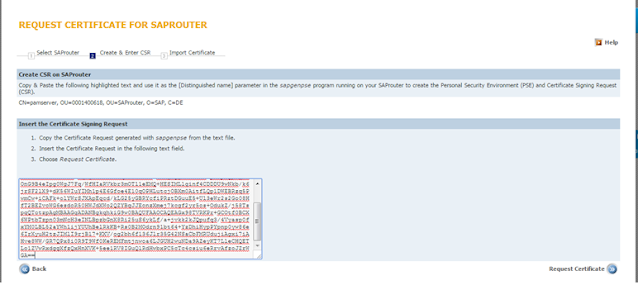
4. Select SAProuter Distinguished Name & Click on option "Submit CSR",

5. Copy the text from 'certreq1' & past in the window, Click on "Request Certificate",

6. Copy the new text got from the window,

    Create a file with name - srcert
    save the text to the 'srcert' file

7. Install the certificate by running the below command,

    ./sapgenpse import_own_cert -c srcert -p local.pse

8. Create the credentials for the SAProuter with below command,

   ./sapgenpse seclogin -p local.pse  -O <user>

9. Check the Certificate has been imported successfully using below command,

  ./sapgenpse get_my_name -n Issuer

10. verify the Validity Date using following command,

./sapgenpse get_my_name -n validity

SAP Router (Windows Server) Configuration.

 1.  Download the latest saprouter from the Marketplace,


Ø Login to the SAP Support Portal with the S-user ID which is assigned to your installation
Ø  Use the latest SAProuter version, which can be downloaded from the SAP Software Download Center
Ø  Support Packages & Patches 
Ø  A-Z Alphabetical List of Products 
Ø  S
Ø  SAPROUTER
Ø  SAPROUTER (latest version)
Ø  your preferred O.S. version
Ø  saprouter_XXX-XXXXXXXX.sar


2.  Download the latest SAP Cryptographic Library from the SAP Software Download Area,

Ø  Support Packages & Patches
Ø  A-Z Alphabetical List of Products
Ø  S
Ø  SAPCRYPTOLIB
Ø  COMMONCRYPTOLIB (latest version)
Ø  your preferred O.S. version
Ø  SAPCRYPTOLIBP_XXXX-XXXXXXXX.SAR

3. Executing the commands,

 ·   SAPCAR  -xvf saprouter_XXX-XXXXXXXX.sar will unpack the following files:
saprouter[.exe]

·    SAPCAR  -xvf SAPCRYPTOLIBP_XXXX-XXXXXXXX.SAR will unpack the following files:
[lib]sapcrypto.[dll|so|sl]
sapgenpse[.exe]


4. Create the new folder,

(e.g. /usr/sap/saprouter).  Copy the file that we are extract through SAPCAR


5. Set the environment variables for SNC_LIB and SECUDIR,

My computer (right click)---> properties---> advanced system setting ----> advanced ---> environment variables ---> new 

SECUDIR---> path  till saprouter folder
SNC_LIB----> path till sapcrypto.dll


6. Create saprouttab  file in saprouter folder in file format,

7. Download the Distinguished Name from the SMP,

www.service.sap.com/saprouter-sncadd


Distinguished Name------> CN=pamserver, OU=0001400618, OU=SAProuter, O=SAP, C=DE

8. Create “certreq” file,

Now create a “certreq” file  in the  file format  in saprouter folder

9. Request for router license,

Enter the command on the command prompt
Sapgenpse get_pse -v -r certreq -p local.pse “<Distinguished Name>”
eg : Sapgenpse get_pse -v -r certreq -p local.pse “CN=sapserver, OU=xxxxxxxxxx, OU=SAProuter, O=SAP, C=DE”


Now open the certreq file with notepad


Copy the text and past it into the marketplace


Click on Request Certificate 


Copy the text in the executed page

10. Create “srcert” file in the file format in the saprouter folder,

 Past the copyed text in the “srcert” file

11. Import the certificate using the below command,  

sapgenpse import_own_cert -c srcert -p local.pse


Confirm that the import was successful
e.g: CA-Response successfully imported into PSE "/usr/sap/saprouter2/local.pse"

9. Create credentials for your PSE and secure your credentials file,

sapgenpse seclogin -p local.pse -O <user_for _SAProuter>

 eg : sapgenpse seclogin –p E:\usr\sap\saprouter\local.pse –O administrator
 Type in your PIN/Passphrase when prompted
 This generates the cred_v2 file


10. Check the command,

sapgenpse get_my_name -v -n Issuer
This should result to
Issuer  : CN=SAProuter CA, OU=SAProuter, O=SAP Trust Community II, C=DE


11. Now we need to maintain the details in the saprouttab file,

Model from SAP Marketplace :


Eg:


12. Download the CA certificate from SAP note 2131531,


Download the object from the sap note  (last of the not)
Copy   smprootca.der  in to the saprouter folder

 Import the certificate
 sapgenpse maintain_pk -a smprootca.der -p local.pse

13. SAProuter service creation,

Enter  this command to the saprouter service creation

sc.exe create SAPRouter binPath= "saprouter.exe service -r -W 60000 -R saprouttab -K ^p:CN=sapserver, OU=xxxxxxxxxx, OU=SAProuter, O=SAP, C=DE^" start= auto obj= "NT AUTHORITY\LocalService"

Eg: sc.exe create SAPRouter binPath= "E:\usr\sap\saprouter\saprouter.exe service -r -W 60000 -R E:\usr\sap\saprouter\saprouttab -K ^p:CN=sapserver, OU=xxxxxxxxxx, OU=SAProuter, O=SAP, C=DE^" start= auto obj= "NT AUTHORITY\LocalService"


Then goto -----> Services
Right click on SAProuter service----> Propertice-----> logon
Type the user of saprouter and password


 Then goto “regedit”
 (Search on the system)

HKEY_LOCAL_MACHINE -----> SYSTEM -------> Services -------> saprouter ------>  double Click on image path


Remove the  “^”


14. Starting SAProuter,


15. Goto OSS1,

Parameter-----> Technical Setting
Fill the entries for the OSS connection


15.Goto SM59,

Select  ABAP Connections-----> Double click on SAPOSS------->  Connection Test


It show no errors in your Router Connection